
 875
875
CLASS DESCRIPTION
This class will review how the vendor files are seen as unpaid or paid in the sales ledger and walk through the different ways to pay those bills. Printing an Individual check for a partial payment, paying with a credit card, Paying more than one invoice for a vendor on one check and also batch payments for multiple vendors.
TRAINING PHILOSOPHY
Our goal is to streamline your implementation and staff training. To make this process effective, we have created a training system designed specifically for your business. We ask for your commitment to preparation and training. Your commitment to Training will make a significant impact on your cash flow, processes & overall profitability.
KEY TERMS
Bill- an Invoice received from a vendor that will be paid by your company. (can be interchangeable with Invoice)
Invoice- a Bill received to be entered and paid by your company (can be interchangeable with Bill)
Accounts payable Subledger- The AP subledger is a detailed list of unpaid and paid bills managed through the AP GL. As soon as an item or a bill (with payment terms) is received, it is entered and listed as unpaid in the AP subledger. The bill payment is then managed based on cash management processes. Once paid, the bill is marked paid in the subledger, the bill amount is no longer part of the AP liability balance and the payment details are added to the bill.
SECTION 1. PARTIAL PAYMENTS
Partial payments are used for Vendors you may be paying over time
-
In the Vendor File (‘V’ or ‘Shift + F6), select F10 to search for a vendor
-
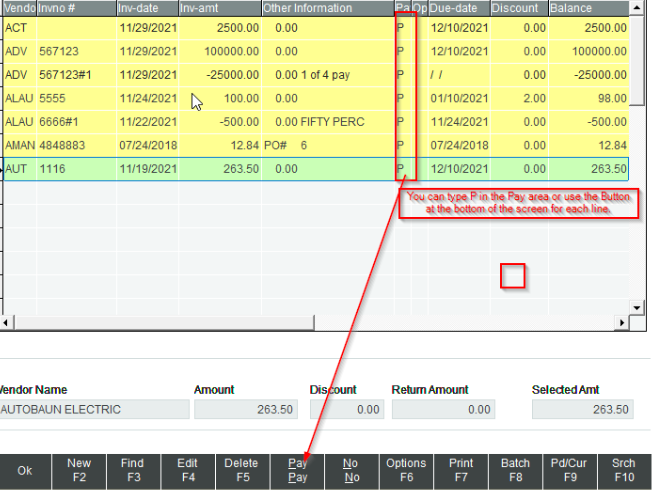
Select Ap. (F8) and click on the line you are wanting to pay, there should be an ‘N’ showing in the ‘Pay-Mrk’ column

-
Hit ‘P’ or ‘Pay’
-
You will see the ‘N’ change to a ‘P’


-
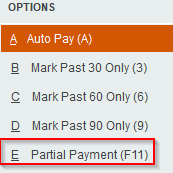
Select Options (F6) -
-
On the Options menu select ‘F11’ or click ‘E. Partial Payment’

-
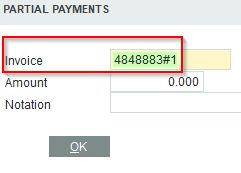
The ‘Invoice’ section will be highlighted on the next screen, hit ‘Enter’
-
Next, you will need to enter the amount you want to pay and hit ‘Tab’. If you would like to notate why you are taking a partial payment fill in the ‘Notation’ section, then select ‘OK’

-
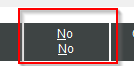
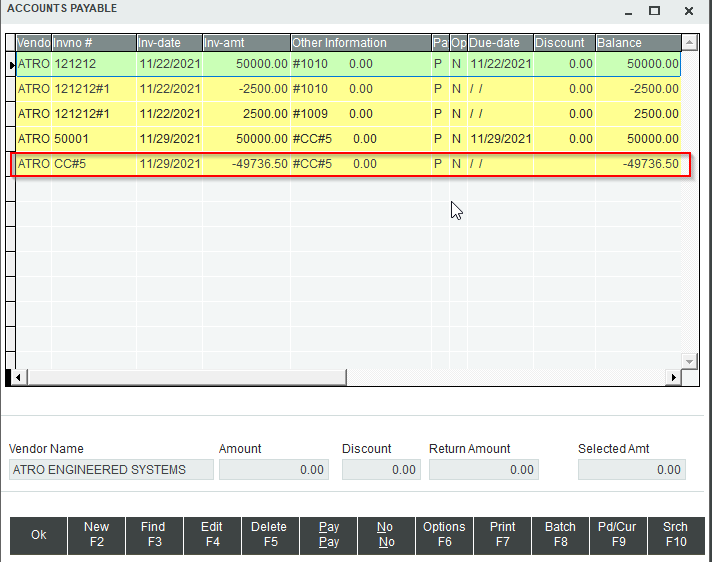
You will be back to the Accounts Payable screen where you should now see the original amount owed AND two new amounts in the ‘Pay-mrk’ column: A positive and a negative amount
-
Click on the positive amount and press ‘P’ or the ‘Pay’ button
-
Click on the original amount and press ‘N’ or the ‘No’ button, do the same for the negative amount
-
This is what your ‘Pay-Mrk’ column should look like:

-
Select ‘OK’ and ‘Esc’ to get back to the main Vision screen
NOTES
_______________________________________________________________________
_______________________________________________________________________
_______________________________________________________________________
_______________________________________________________________________
_______________________________________________________________________
_______________________________________________________________________
_______________________________________________________________________
SECTION 2: CREDIT CARD PAYMENT
Paying an invoice with a credit card
-
In the Vendor File (‘V’ or ‘Shift + F6), select F10 to search for a vendor
-
Select Ap. (F8)
-
If there are any other open invoices not paid in this screen, we will need to mark them with an N for not ready to pay
-
If you notice the payment amount is less than the full amount of the bill. You will see it is pulling the credit payment due to the date being before the tenth as this is how the customer was set up
-

-
Select Option (F6) then F- Pay Credit/Card (F12)

-
The system will prompt you for the vendor for the credit card
-
You can search for the bank name for the credit card vendor once highlighted click enter
-
-
Enter the date of the transaction and click ‘OK’
-
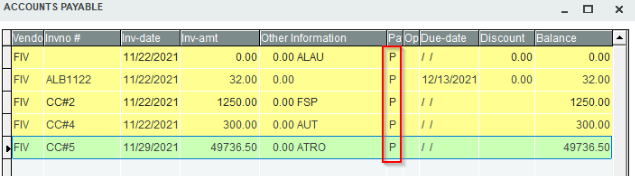
The computer will build a credit record posted to accounts payable general ledger on the original vendor account with an invoice number CC# and a system generated transaction number. Press F9 - to see the paid invoices
-
Now when you check Accounts Payable the original vendor will show a zero balance and the Credit card vendor will show the original invoice amount on that account. Use the vendor history report to show both vendor accounts
Original invoice Systems (Example) Credit card account (Example)

NOTES
_______________________________________________________________________
_______________________________________________________________________
_______________________________________________________________________
_______________________________________________________________________
_______________________________________________________________________
SECTION 3: ISSUING ONE CHECK FOR MULTIPLE INVOICES
-
In the Vendor File (‘V’ or ‘Shift + F6), select F10 to search for a vendor
-
Select Ap. (F8) and P to Pay on all those that do not already show paid (You can type ‘P’ in the ‘Pay-mrk’ area or use the ‘Pay’ button the bottom on each line
-
Print (F7) - to process the payment for this vendor
-
A – printing check F11
-
The same as when printing a single check the box will be the same but the select amount will be for total of all Bills selected
-
-
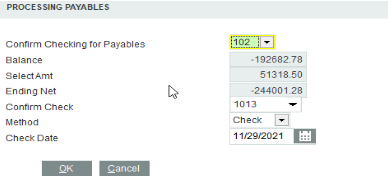
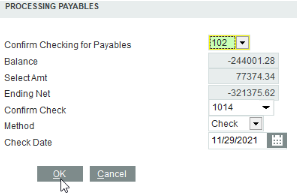
The first prompt will be for the checking account General Ledger Account number
-
The Next prompts will be for the check number and date of check
-
If all is correct click OK
-
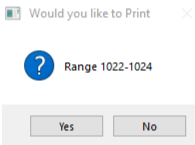
The last prompt will be to print the check, 'Y' or 'N'
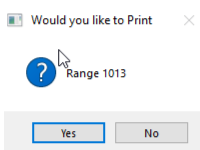
-
Again be sure the check in in the printer before clicking yes
NOTES
_______________________________________________________________________
_______________________________________________________________________
_______________________________________________________________________
_______________________________________________________________________
_______________________________________________________________________
_______________________________________________________________________
_______________________________________________________________________
_______________________________________________________________________
SECTION 4: BATCH CHECK PRINTING
-
From the open window we will click on Accounting
-
B – Accounts Payable

-
Select the invoices you would like to pay by changing the ‘Pay-mrk’ column to ‘P’
-
Select Print (F7)
-
Select D - Open Invoice Report
-
Select B- View Invoices Marked for Payment
-
The report will view to the screen and can be printed
-
Escape from the report or use the door at the top of the screen
-
-
Click on F8 for Batch


-
Click on “T” For Tag

-
As you click the Tag button or use the T on the keyboard it will place an Asterisk “*” next to each of the items selected to be paid. This is just verifying the Items as how many invoices are included in each check to this vendor
-
You can also use the T-All [F9] if you are confident all will be paid and are correct
-
-
Click Process (F8) - Same as before, verify the Payables checking account, the Balance, the check number, and the date
-
The system will go through and assign check numbers to each vendor - Warning The system will always use the sequence numbers setup in the check register, please make sure they are correct before batching a bunch of checks
-
Click ESC OR Exit
-
Verify the check range is correct, Click Yes
-
Prepare checks in printer before printing
-
The system will go through and assign check numbers to each vendor
-
Now your Accounts Payable should be empty

-
Press F9 to see all of your paid invoices
-
You can toggle between the Paid and unpaid using the F9
-
These invoices are still accessible to edit offsetting General Ledger numbers if necessary
-
You should not edit the invoice amount, discount amount, paid date or check number
-
NOTES
_______________________________________________________________________
_______________________________________________________________________
_______________________________________________________________________
_______________________________________________________________________
_______________________________________________________________________
_______________________________________________________________________
_______________________________________________________________________
_______________________________________________________________________

