
 960
960
Payable invoices and detail can be accessed two different ways. Access to Accounts Payable can be from the Accounting System menu under B. Accounts Payable, or use the [F8] option under the Vendor File view.
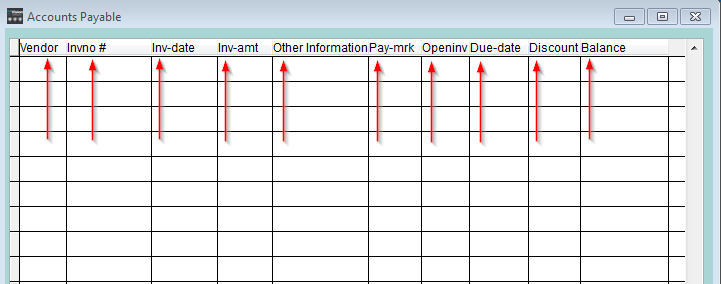
Vendor Vendor ID as setup in the Vendor Maintenance file
Invno Invoice Number, payable invoice number from vendor
Inv-Date Invoice Date, date the invoice was issued from the vendor
Amt Amount of the payable invoice
Other Information Return amount and Description, or the PO# as sent from PO’s
Pay Pay Status (O=open, N=not selected for payment, P=to be paid)
Open Open Status (Paid=Y, default is blank for Un-Paid)
Due-Date Due Date on the Payable invoice as agreed with the Vendor
Discount Discount amount allowed as setup in Vendor Maintenance
Balance Total balance of the invoice due, minus the discount if any exists
Function Keys
Function keys shown at the bottom of the screen:
[F4] Edit press [F4] to edit the selected record
[F7] Print menu options
[F8] Process Batch payment procedure
[F9] Toggle view option between Paid Invoices and Open Invoices
[F10] Search press [F10] to search for a vendor by name, vendor must be on file
[F3] Find press [F3] or select [Find] to search by any Detail: invoice date, charge, discount, PO#, due date, ect…
Manually Adding Payable Invoices
Press [F10] to locate Vendor Account
Press [F2] to add a new payables invoice manually.
The cursor will begin in the Invoice Number field; fill in the Invoice Number as provided by the vendor, the system will not accept duplicate invoice numbers.
Enter the invoice number
Enter the invoice amount
Double check the due date, discount date and discount amount
If the expense vendor is setup with general ledger numbers verify the distributions
Use the [F10] feature to search for a General ledger number to apply this invoice
When the correct GL numbers and distribuitons are entered and the transaction (debits = credits) balance, save the transaction
there are four different ways to save the transaction
Ctrl+Enter
[F4] Close
Click with the mouse on the <<OKAY>> button
*If you have another invoice for the same vendor press F2 to insert the next Invoice and save the current invoice
Pay Vendor from Checking
Mark invoices P to Pay – double check the Select amount
Press [F7] to create a check, press A or [F7] again to create a check
Verify checking account with [OK] or Enter
Confirm Check use sequential check number or press [F10] to use an adjustment number
Confirm date of Check
Print Yes or No
Pay Vendor with Credit Card
Mark invoices P to Pay – double check the Select amount
Press [F12] – system will prompt for ‘vendor’ select appropriate CC Vendor Account
NOTE: this is not the same as using a Debit Card – Debit Card payments should be processed the same as a check just use [F10] in the check number field to let the system generate a number.
Pay Batch or Group of Vendors
Mark invoices P to Pay (use features under [F6] by due date or manually mark invoices)
Print a report to check marked vendors:
[F7] Print
D. Open Invoice Report
B. Invoices Marked for Payment
[F8] Batch
T to tag vendors to pay that were verified on the earlier report
[F8] to process – system will prompt to verify checking account, check number and date.
[Esc] to leave batch process screen when done
Print Yes or No
Common Tools and Reports for A/P
Accounts Payable Maintenance
Checks for duplicates, missing Vendors and verifies Vendor balances
A. Accounting Menu
I. Accounting Utilities
A. Accounting Maintenance – press any key when done, if problems show up fix them the only invoices that should show as ‘duplicate with diff amount’ are partial payments.
*NOTE: run this utility if payables checks had to be deleted also if several invoices have been deleted or moved.
Verify Payables GL to Detail Diagnostic
A. Accounting Menu
B. Accounts Payable
[F7] Print
G. Verify Payables Diagnostics – leave default ‘N’ for no on all three prompts
Difference should be ZERO 0.00
Aged Payables report
A. Accounting Menu
B. Accounts Payable
[F7] Print
C. Vendor AP Aging – verify date – Summary Aging=Y, Open Only=Y
Aging AP GL # (this should match the above mentioned Aged Payables report)
A. Accounting Menu
B. Accounts Payable
[F7] Print
I. A/P GL Aging
Verify GL, Date and leave defaults
Vendor History Detail (Audit)
A. Accounting Menu
B. Accounts Payable
[F7] Print
F. History Report
DO NOT edit or delete Previous Year Payables unless they are also edited or deleted out of the previous year. Previous Year Ending Detail and Ending General Ledger totals must match, that is what the Verify Payables GL to Detail Diagnostic checks
Other Payables and Vendor detail reports are available under the Accounting System Menu
H. Accounting Reports
A. Vendor / Payables Reports
Use [Ctrl] & [F7] in the Payables or Vendors area to customize your own report

