
 796
796
The Item Number has been discussed in detail as the Most Important field on an Inventory record - however if a number was entered incorrectly or changes due to manufactures stipulation you may have to edit that record.
Here are a few simple facts about the way your program works; if you delete or change a part number the sales and purchases still exist you do not lose that information, you are simply changing or removing the quick access to that information on the Inventory screen. Reports will still have the part transactions on it (if you change sales history this will change the report details also to match the new part number read through to see this option). At the end of this section is a tool suggested for tracking edits to inventory.
Select the [F4] Edit button or press [F4] on your keyboard to begin editing.
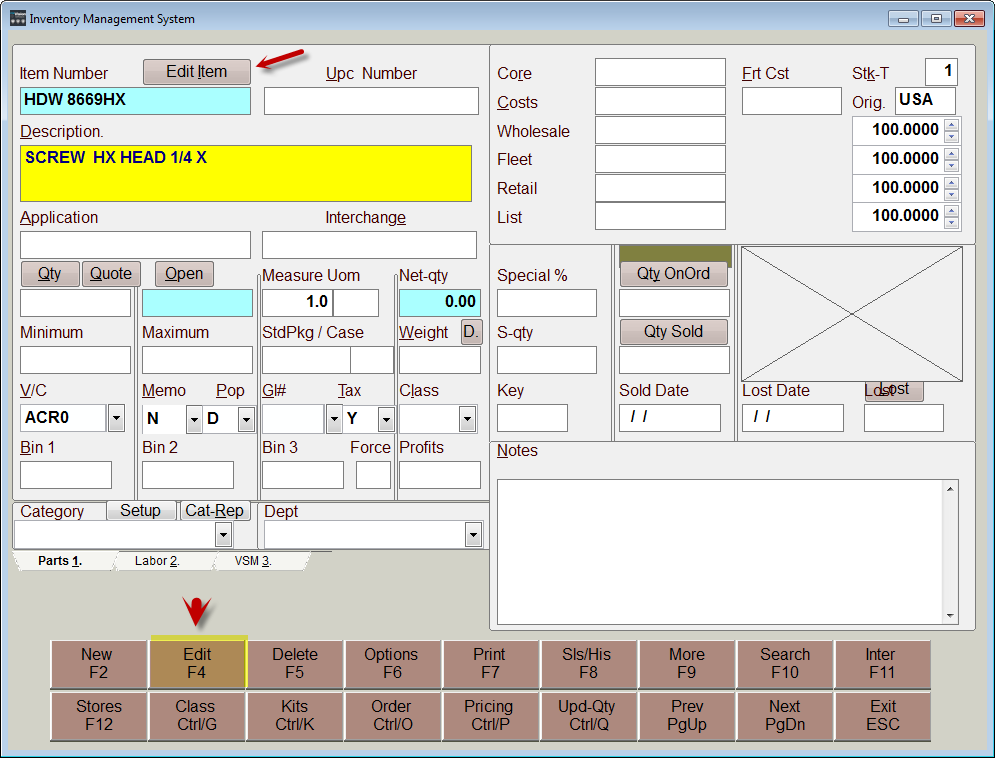
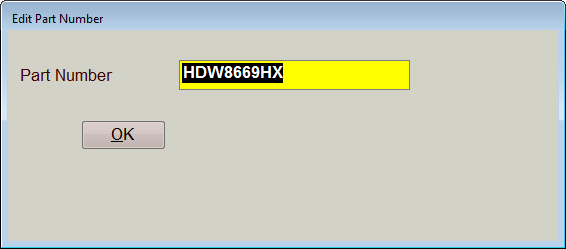
When using [F4] to edit notice that the Item Number is actually protected you have to click on the button that says Edit Item to get to the Part Number field.
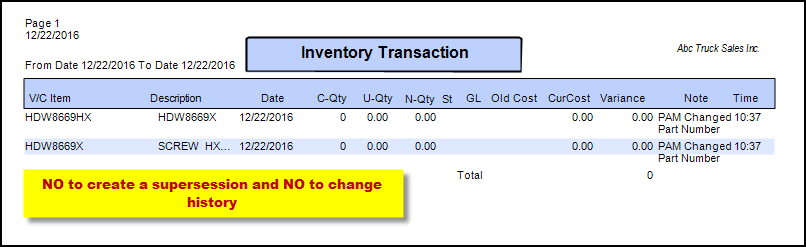
The first question the system asks is to create a Supersession for the old part number.
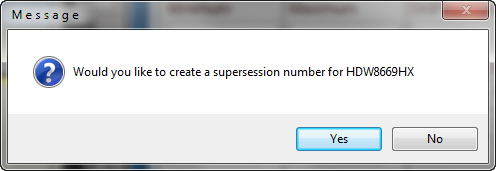
If you selected Yes to create a supersession and Yes to update All Attachments and History the prompts are done and you will now have an item setup with a superceded Interchange to the old part number but all future sales and references will be to the new part number.
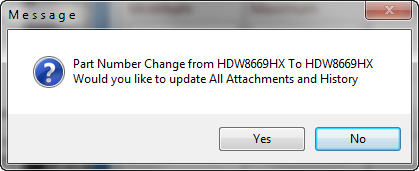
If you selected No to create a supersession and Yes to update All Attachments and History there is one more prompt.

Reporting on Edited Part Numbers
Using the Inventory Transactions report to review Edits to Inventory Parts; refer to Inventory Transaction Report section for more suggestions on using this report.
This report will show any items edited with no supersessions created; go to ANY inventory item and select [F7] Print for the Label Menu, select R. Report Transactions, if prompted for printer select OK the following prompts will appear
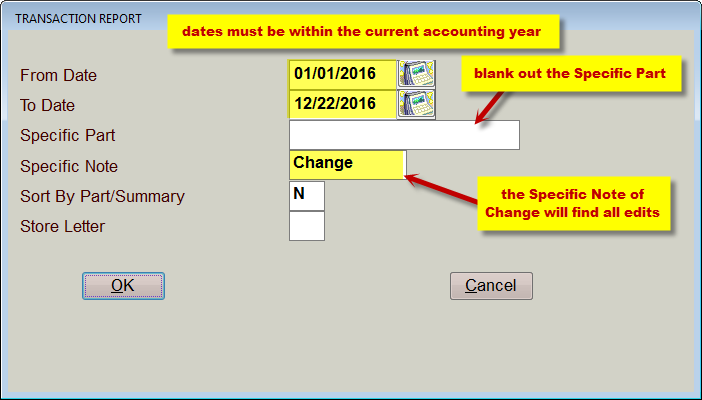
- The From Date and To date must be within the current year; when properly monitoring your Inventory run this report once a week or month for recent activity only.
- Delete the Specific Part to view ALL parts or enter a portion of the part to find specific entries.
- In the Specific Note enter the word Change in proper case (upper case C with all others in lower case).
- Leave the Summary option N
- Select OK
NAVIGATING INVENTORY Fields
There are several ways to navigate through the fields; the mouse and left mouse button, the Enter key, the arrow keys, the Tab key and Shift Tab keys along with hotkey letter combinations.
Mouse Use the Mouse to navigate the cursor to a specific area—simply point the mouse and left click once to place the cursor on that specific spot.
Arrow Keys The arrow keys will move the cursor up and down through the fields or left and right within a field
[TAB] Use the [TAB] Key to move through each individual field one at a time.
[Shift] + [Tab] The combination of [Shift] and the [Tab] keys together takes the cursor backwards to the previous field
[Alt] + letter Use [Alt] + [letter] to go to that specified area—notice on the screen that there are letters within words on field names that are underlined such as in the Cost field has the letter C underlined, by pressing the [Alt] key and the letter C the cursor will automatically move to the Cost field.
[PgDn] Using the [PgDn] key while in the edit mode will move the screen to the next inventory item on the list. The cursor will remain in the same field while the user Pages Down through the records
[PgUp] Using the [PgUp] key while in the edit mode will move the screen to the previous inventory item on the list. The cursor will remain in the same field while the user Pages Up through the records
NOTE: remember to [Tab] or [Enter] to leave the edited field to confirm your changes and save them properly, a few fields are tied to other areas and will prompt for further action when edited.
